So, back in 2006, in preparation for the first International Babywearing Conference, I made this:

Yes, this is a duct tape mei tai. And that’s wee Shiny at 16 months old.

I designed it to be reversible. Kristi Hayes-Devlin of Wrapsody demonstrated it as a back carrier, with the reverse side showing.

Once I buffered Shiny’s skin with a scarf, she fell asleep. It was pretty comfy, all things considered.
Gabi, who founded Beco, was inspired. With a pillowcase and a couple long strips of duct tape, she made a podaegi. Someone added a pair of sling rings to turn it into an onbuhimo at some point.

It was epic. And pretty legendary. I always thought about making another duct tape carrier but never quite had sufficient motivation. A full duct tape mei tai takes about $20 of tape and 2 1/2 to 3 hours worth of work. It’s actually easier to make a carrier out of fabric. With a duct tape carrier you’re basically making the fabric, as well as the carrier.
Fast forward from August of 2006 to January of 2014. How is it possible that over 7 years have passed? And pray tell, how could *I* possibly forget ALL my baby carriers at home? Every one. My car had been cleaned out thoroughly, so no stragglers. And we were in Seattle, at a filk convention, with a rambunctious two year old who decided that running away was the new game of the moment.
I considered, briefly, hijacking a bedsheet. But I had to go to the store anyway, and thought, “You know, if after 20 years of babywearing I can’t come up with something more fun than a plain white hotel bedsheet, I’m clearly doing it wrong.”
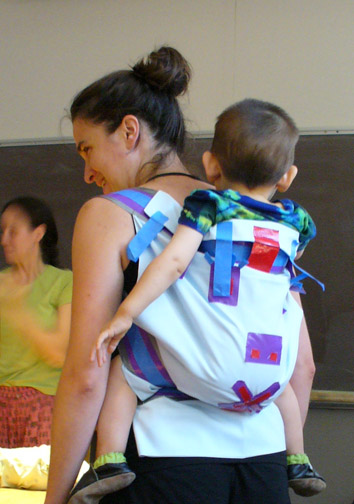
Four rolls of duct tape and two and a half hours later, I had this:


That, my dears, is a fixed-strap half mei tai, custom sized for Miles and for me. I knew I wouldn’t use it on the front, so no need to waste tape and time and effort making the top straps adjustable. I didn’t want a whole lot of bulk around his middle, and knew where the stresses and supports needed to be, so I shaped it. Made the waist band long enough to do tibetan style, knowing that every step I could take to pull the tape straps out of my armpits would add half an hour to the time I could wear this. Plus, tibetan style, I would not have to knot the duct tape straps–I just went back and forth a couple times between the two straps and the friction held everything VERY securely in place.


He looks a lot like his sister.
I used it all weekend, for up to a half hour or so at a time. It worked best when I wrapped a scarf (bought one with the duct tape, just in case) around his bum and my waist, drawing his weight in lower down. But even without, was quite serviceable. Not as good as a padded toddler carrier, but certainly as comfy or more comfy than the vast majority of other carriers.
20 1/2 years of babywearing.
Yep, I still got it.
Now, for some technical details, rules I follow, because while I am not RECOMMENDING that others try this, I know some people probably will and it would be wise for people to observe some safety guidelines.
1. No adhesive is to come in contact with baby, and should not come in contact with the wearer once the carrier is finished.
2. ALL places on the carrier must have at least 4 layers of tape, and any non-strap area must have tape running in multiple directions. I make a “sheet” of duct tape fabric by lining the tape up in one direction, then applying tape to the glue side at a different angle. I used no scissors in the making of the most recent one, but the tidiest result will happen if you make a big sheet of rough-edged double-layer “fabric” out of duct tape and then trim the edges.
3. Attention to strap safety is a must. The straps on this are four layers thick… and they are reinforced where they join the body. In fact, I applied the straps when there were two layers of duct tape to the body, and then went over the top with more layers of tape, creating one large “piece” shaped and strapped.
4. Finish edges with half-strips of tape. This will prevent tearing and keep the glue off everyone’s skin.
5. If you are planning on wearing baby on the front, DO make longer top straps and go the mei-tai route. If you are not going to use it as a front carrier, you can do fixed straps. I did this with help from my husband, tying the carrier around my waist while he held our son in place, then measuring the length of the top straps on our bodies. If you want a more SSC style carrier you’re going to need to get some side release buckles, and at that point you might as well sew the darned thing out of fabric, it will be more comfy.
6. Rulers are not needed. I used a piece of folded-over tape to measure from the front of one of his armpits, around his back, to the front of his other armpit, and then added some width for tape. I measured from the back of his neck to the front of his crotch, and from knee to knee across his bum. That set the width of top and bottom and the length of the carrier (essentially tied apron style, though that’s not how I put it on.) The bottom straps I just made “plenty long”. The hourglass middle is a little wider than the width of his back and positioned near his hips. His legs are well enough supported. If I”d been less tired I might have shaped the body and made it a little wider in the middle.
7. The core of this is relatively inexpensive silver standard duct tape. Decorative print duct tape is much spendier, so save it for the outer later. All layers are structural, but having a core of 2 layers of silver and then making it completely covered with decorative tape to the point where no silver shows guarantees sufficient tape throughout.
Duct tape is very strong lengthwise, but is designed to tear. This is why multidirectional tape is a must in all places and finished edges are a must. Most fabrics are designed this way!
This required no sewing, no hardware, no scissors, no rulers. It is custom and fitted to us, but not “share-able” the way a full four-strap mei tai would be.
Combining duct tape and fabric is possible, but you need to pay attention to stresses and reinforcement.
Every time you wear a carrier, no matter what it is made from, you MUST check it for wear. A $20 duct tape carrier WILL wear out with use, duct tape is not designed to withstand constant flexing and friction, so you do need to check it every single time, especially at stress points.
I am more comfortable using a duct tape carrier on an older baby or toddler. For an infant I’d rather use a bedsheet. This is a good “In a pinch” carrier, but duct tape is not designed for babies to mouth. On a mei tai, you can “dress” the mei tai with a long sleeved shirt to protect baby from the tape, if you must.
These are really best for short term use, and in situations where you want to get people talking about babywearing. I took my first duct tape carrier to the SCA…
